

If building stronger glutes is one of your training goals, the hip thrust deserves a place in your routine. It is a relatively simple movement, but when performed correctly, it can provide a serious challenge to the glutes and help improve your ability to extend your hips under resistance.
The exercise has become especially popular in strength training and glute-focused programs because it allows you to progressively increase resistance without requiring the same level of balance or coordination as some other lower-body exercises. That makes it useful for beginners learning to train their glutes as well as experienced lifters looking for a movement they can progressively load.
However, simply placing a barbell across your hips and lifting it up and down is not enough.
Your setup, foot position, bench height, range of motion, head position, and control all affect how the movement feels and where you place the most tension. Small changes can make the difference between a controlled glute-focused repetition and a movement where your lower back or hamstrings are doing more work than intended.
This is why learning proper hip thrust form is important before worrying about how much weight you can lift.
In this guide, we’ll walk through how to get into hip thrust form, how to perform a barbell hip thrust correctly, how to adjust your position, which mistakes to avoid, and how to progress from a basic bodyweight variation to more challenging versions.
Whether you train at a commercial gym or work out at home, understanding the fundamentals will help you get more from every repetition.
Why Are Hip Thrusts So Effective?
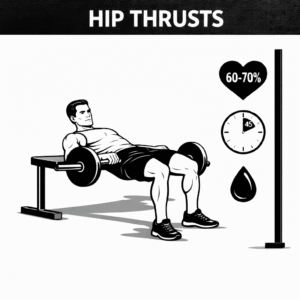
The hip thrust is primarily a hip extension exercise. During the movement, your hips move from a flexed position toward extension while your glutes work to produce the majority of the force.
This makes the exercise particularly useful for developing glute strength and building the muscles responsible for powerful hip extension.
Your glutes play an important role in much more than appearance. They contribute to movements such as running, jumping, climbing stairs, standing up, and changing direction. Strong glutes can also help you produce force during other lower-body exercises, including squats, deadlifts, lunges, and split squats.
One reason people enjoy hip thrusts is that they are relatively straightforward to learn. Once your bench position and foot placement are established, the movement follows a clear pattern. You lower your hips, drive them upward, contract the glutes, and return under control.
The exercise can also be progressed in several ways. You can begin with your bodyweight, add a resistance band, use a dumbbell, move to a barbell, or eventually use a dedicated hip thrust machine.
This makes the hip thrust useful across different training levels.
It is also worth understanding that hip thrusts should not replace every other lower-body exercise. Squats, deadlifts, lunges, split squats, and other movements challenge the hips and legs in different ways. A well-rounded training program can include hip thrusts alongside these exercises rather than treating one movement as the solution to every glute-building goal.
How to Do a Barbell Hip Thrust With Proper Form
The barbell hip thrust is one of the most popular ways to perform the exercise because it allows you to add substantial resistance as your strength improves.
Before loading the bar heavily, spend time learning the setup with a light weight or even your bodyweight. The setup should feel stable before you begin increasing resistance.
Step 1: Set Up the Bench and Barbell
Start with a sturdy, stable bench that will not slide backward or tip as you press against it.
Sit on the floor with your upper back positioned against the long edge of the bench. The bench should contact your upper back around the area just below the shoulder blades. You do not want the bench pressing into your lower back or positioned so high that it restricts your movement.
Place the barbell across your hips.
If you’re using a heavy barbell, avoid trying to awkwardly lift it from the floor and position it yourself. Use bumper plates that provide enough clearance to roll the bar into position, or have a training partner help you when necessary.
A barbell pad can make the exercise considerably more comfortable, particularly as you begin using heavier loads. If you do not have a pad, a folded towel can provide some cushioning.
Before beginning your first repetition, make sure the bench, barbell, plates, and your own position are all secure.
Step 2: Find Your Starting Position
Once the bar is positioned across your hips, bend your knees and place your feet flat on the floor.
Your feet can begin around shoulder-width apart, but you may need to make small adjustments based on your body proportions and how the movement feels.
Your upper back should remain supported by the bench, while your hips stay close enough to the bench that you can move through a controlled range of motion.
Take a moment to check your feet before starting the first repetition.
Foot placement is one of the most common reasons people struggle to feel their glutes during hip thrusts. If your feet are too far away from your body, you may feel more work in your hamstrings. If they are positioned too close, your quadriceps may become more dominant.
A useful reference point is the position of your lower legs at the top of the movement. When your hips are fully extended, your shins should be close to vertical.
This is not a rule that everybody must follow perfectly, but it is a useful starting point for finding a productive stance.
Step 3: Brace Your Core and Prepare to Thrust
Before lifting your hips, establish a stable position through your upper body.
Keep your chin slightly tucked and your eyes directed forward rather than looking toward the ceiling. Your ribs should remain controlled rather than flaring upward.
Take a breath, brace your midsection, and prepare to drive your hips upward.
This setup is important because the goal is to create movement primarily through the hips rather than compensating by excessively arching the lower back.
Step 4: Drive Your Hips Up
Push through your feet and drive your hips toward the ceiling.
As your hips rise, focus on extending through the hips rather than simply lifting the bar as high as possible.
At the top of the movement, contract your glutes firmly.
Your body should reach a strong, controlled position with your shoulders supported by the bench and your hips extended. Your torso and thighs should create a relatively straight line rather than your lower back becoming dramatically arched.
You do not need to force your hips higher than your body can comfortably control.
The highest point of the repetition should come from hip extension and glute contraction, not from throwing your head backward or pushing your ribs upward.
Step 5: Pause and Control the Descent
Once you reach the top, pause briefly and focus on the contraction in your glutes.
Then lower your hips slowly under control.
Avoid simply allowing the weight to drop toward the floor. The lowering phase is still part of the repetition, and controlling it keeps tension on the muscles while allowing you to maintain better positioning.
Lower until you reach the bottom of your comfortable range, then begin the next repetition.
Try to maintain control throughout the entire set rather than rushing through the final few repetitions.
For someone focused on building glute strength and size, three to four sets of approximately eight to twelve repetitions can be a useful starting point. The appropriate number of sets and repetitions will depend on your overall training program and experience.
What Muscles Do Hip Thrusts Work?
The gluteus maximus is the primary muscle involved in the hip thrust. It is the largest of the three gluteal muscles and plays a major role in hip extension.
The hamstrings also contribute to the movement, particularly as the hip moves through its range of motion. Your core works to stabilize your trunk, while other muscles around the hips help maintain control and alignment.
The exact amount of work performed by each muscle can change depending on your technique, foot position, resistance, range of motion, and individual anatomy.
That is why there is no need to become overly focused on trying to make one muscle work in isolation. Instead, concentrate on performing the movement with good control and establishing a position that allows you to feel your glutes working without creating unnecessary tension elsewhere.
If your goal is glute development, the hip thrust can be a valuable part of your program, but overall results will still depend on your training volume, progressive overload, nutrition, recovery, and consistency.
The Most Important Hip Thrust Form Cues
Once you understand the basic movement, a few simple cues can make your technique easier to remember.
Keep your chin slightly tucked rather than looking upward. Maintain a controlled rib position and avoid turning the top of the movement into a lower-back extension exercise.
Keep your feet firmly planted throughout the repetition. Rather than obsessing over whether your heels are doing all the work, focus on maintaining stable contact with the floor and producing force through your entire foot.
At the top, think about bringing your hips into extension and contracting your glutes instead of trying to lift the bar as high as physically possible.
Your upper back should remain supported by the bench in a stable position. If you find yourself sliding around or repeatedly losing your setup, stop and reposition before continuing.
Most importantly, use a range of motion that you can control.
Good hip thrust form should look relatively consistent from the first repetition to the last. If your technique changes dramatically because the weight is too heavy, the load is probably beyond what you can currently control.
Common Hip Thrust Mistakes to Avoid
The hip thrust is not particularly complicated, but there are several mistakes that can reduce its effectiveness.
Overarching Your Lower Back
One of the most common problems occurs at the top of the movement. Some lifters try to raise their hips as high as possible and end up arching their lower back instead of simply extending their hips.
This can shift tension away from the intended movement and create unnecessary stress around the lower back.
Think about keeping your ribs controlled and your core engaged as you reach the top. Your goal is not to create the largest possible arch. Your goal is to achieve strong hip extension while maintaining a stable torso.
If you feel your lower back working significantly more than your glutes, reduce the load and reassess your technique.
Placing Your Feet Too Far Away
Foot placement has a noticeable effect on how the hip thrust feels.
If your feet are positioned too far forward, your hamstrings may become heavily involved. If they are too close, you may feel your quadriceps doing more of the work.
Start with your feet around shoulder-width apart and check your lower-leg position at the top. Adjust gradually until you find a stance that allows you to maintain stable feet and a strong glute contraction.
There is no need to copy another person’s exact foot position because body proportions differ.
Using a Partial Range of Motion
Short repetitions can sometimes be useful when intentionally programmed, but consistently performing shallow hip thrusts may prevent you from training through the range you can comfortably control.
Lower your hips under control and reach a strong extension at the top without using momentum.
The goal is not to force an exaggerated range. Instead, use the largest comfortable range in which you can maintain good positioning.
Looking Toward the Ceiling
Throwing your head backward is another common mistake.
It can encourage the rib cage to flare and make it easier to compensate through the spine at the top of the movement.
Keep your chin slightly tucked and maintain a neutral, comfortable neck position throughout the exercise.
Loading Too Much Weight
The amount of weight on the bar is easy to use as a measure of progress, but heavier is not always better.
If you need to bounce the weight, shorten the range of motion, lose your foot position, or hyperextend your back to complete the repetitions, the load is too heavy for your current level of control.
Reduce the weight and rebuild your technique.
Progressive overload works best when the movement remains consistent as resistance increases.
Hip Thrust Variations for Different Training Levels
You do not need to begin with a barbell to benefit from hip thrusts. In fact, starting with a simpler variation can make it easier to learn the movement and understand what proper hip extension feels like.
Bodyweight Hip Thrust
The bodyweight hip thrust is an excellent starting point for beginners.
With your upper back supported on a bench or stable elevated surface, perform the same hip extension movement without additional resistance.
Because there is no external load, you can concentrate on your setup, foot position, core control, and glute contraction.
It can also be useful as a warm-up before heavier lower-body training.
Banded Hip Thrust
A resistance band placed around the thighs, generally above the knees, can add another challenge to the movement.
The band encourages you to maintain control of your knees and provides additional resistance as you move through the exercise.
Start with a manageable band rather than choosing the strongest resistance available. You should still be able to maintain stable foot placement and controlled hip extension.
Dumbbell Hip Thrust
If you train at home or your gym does not have a barbell available, a dumbbell can provide effective resistance.
Place the dumbbell securely across your hips and use your hands to keep it stable during the movement.
This variation is particularly convenient when you are working with moderate loads and do not need the heavier loading potential of a barbell.
Hip Thrust Machine
A dedicated hip thrust machine provides a fixed setup that can make the exercise easier to learn and more convenient to perform.
Because the machine controls much of the setup, it can be useful for people who find positioning a barbell awkward.
However, the machine is not automatically safer simply because it provides more stability. You still need to use an appropriate range of motion, control the resistance, and avoid loading more weight than you can handle.
For someone learning how to use hips thrust machine form correctly, start with a light resistance and spend time understanding the machine’s positioning before progressing.
Single-Leg Hip Thrust
The single-leg hip thrust increases the challenge by requiring one side of the body to perform most of the work.
It can be useful for improving unilateral strength and exposing differences between the left and right sides.
Because balance becomes more demanding, this variation is generally better suited to people who already have good control with bilateral hip thrusts.
Start with bodyweight before adding resistance.
How Often Should You Do Hip Thrusts?
How frequently you should perform hip thrusts depends on the rest of your lower-body training and how well you recover.
For someone whose primary goal is glute development, performing hip thrusts two or three times per week can work well when the overall training volume is managed appropriately.
However, there is no need to perform heavy hip thrusts every day.
Your muscles need time to recover between challenging sessions. If you are also performing squats, deadlifts, lunges, Bulgarian split squats, or other demanding lower-body exercises, all of that training contributes to your overall workload.
A balanced weekly program might use one heavier hip thrust session and another session with a lighter variation or different repetition range.
The right amount of training is the amount that allows you to continue progressing without consistently feeling exhausted or seeing your performance decline.
Can You Do Hip Thrusts at Home?
Yes. Hip thrusts can be adapted easily for home workouts.
A stable couch, bench, or other sturdy elevated surface can provide the support needed for a bodyweight or lightly loaded variation. You can use a resistance band or dumbbell if you need additional resistance.
The most important consideration is stability. Do not use furniture that slides, tips, or cannot safely support your body weight.
Start with bodyweight hip thrusts until you are confident that your setup is secure. From there, gradually increase resistance as your equipment and technique allow.
Final Thoughts
Hip thrusts can be an excellent addition to a lower-body training program, but getting results is not simply a matter of putting more weight on the bar.
The foundation is proper hip thrust form.
Take the time to establish a stable bench position, find a foot placement that suits your body, brace your core, keep your head and neck controlled, and move your hips through a comfortable range of motion. At the top of each repetition, focus on strong hip extension rather than trying to create an exaggerated arch in your lower back.
Start with the variation you can perform well. For some people, that may be a bodyweight hip thrust. For others, a dumbbell or band may provide the right amount of resistance. As your technique becomes more consistent, you can gradually introduce heavier resistance and more challenging variations.
Most importantly, do not let the amount of weight become more important than the quality of your repetitions. A controlled set performed with good positioning will do more for your long-term progress than a heavier set that forces you to compensate.
Use hip thrusts alongside other effective lower-body movements, give your muscles enough time to recover, and focus on gradual progression. With consistent training and proper technique, the hip thrust can become a reliable tool for developing stronger glutes, improving hip extension, and building a more capable lower body.
Last Updated on August 27, 2026
Written By

Join thousands of readers leveling up their fitness.
Skip the guesswork—get insights on training, health, and the right gear to support your progress.
You may also like
How To Do A Lat Pulldown Correctly
The lat pulldown is one of the best exercises for building a wider, stronger…
10 Different Types Of Deadlifts And Their Benefits
The deadlift is one of the most powerful compound exercises for building…

How to Strengthen Your Knees for Running
Strong, healthy knees are essential for runners, whether you’re logging miles…

Compound vs. Isolation Exercises: What’s the Difference?
When it comes to strength training, all exercises can generally be divided into…
Back Squat Exercise Guide: How to Master Back Squats
The back squat is one of the most effective strength training exercises for…
10 Medicine Ball Ab Exercises You Need To Try
If you’re tired of traditional crunches and planks, it’s time to add some…