

The assault bike has a reputation for being uncomfortable, and for good reason. A hard effort on the bike can leave your legs burning, your breathing heavy, and your arms working just as hard as your lower body. But that same combination is what makes the assault bike such a useful conditioning tool.
Also known as an air bike, the assault bike uses air resistance rather than a fixed resistance setting. The harder you pedal and push, the more resistance the fan creates. Instead of selecting a specific resistance level and working against the same load throughout the workout, you control the difficulty through your own effort.
That makes the assault bike remarkably versatile.
A beginner can use it for a short, controlled session to build basic cardiovascular fitness. An experienced athlete can use it for short sprints that demand near-maximal effort. Someone focused on endurance can spend 20 to 30 minutes maintaining a steady pace, while a CrossFit athlete may use the bike as one part of a fast-paced conditioning workout.
It can also be useful on days when you want to move without the repetitive impact of running or jumping.
The challenge is knowing how to use the machine properly. An assault bike workout is not automatically effective simply because it is difficult. Going all out every time you sit on the bike can quickly lead to excessive fatigue and make it difficult to recover for your other training sessions.
The most effective approach is to match the workout to your goal.
This guide covers eight assault bike workouts designed around different training objectives, from building basic fitness and improving endurance to high-intensity intervals and CrossFit-style conditioning. You will also learn how to pace yourself, what to focus on during each session, and how to track your progress over time.
Why the Assault Bike Works
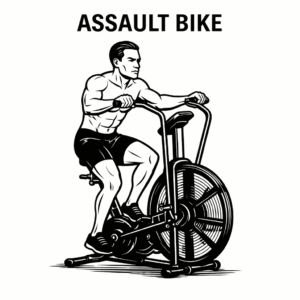
The assault bike is different from a traditional stationary bike because it combines lower-body and upper-body movement.
Your legs drive the pedals while your arms push and pull the handlebars. Your core works to keep your torso stable as the movement becomes faster and more forceful.
Because so much of the body is involved, your heart rate can rise quickly when you increase your effort.
The resistance also responds directly to how hard you work. If you pedal slowly, the fan creates less resistance. If you accelerate and push harder with your arms, the resistance increases with your effort.
This makes the machine easy to scale.
You do not need to change a complicated setting when you want to work harder. You simply increase your output. Likewise, when you need to recover, you can reduce your effort and allow the fan resistance to drop naturally.
That makes the assault bike particularly useful for interval training.
It is also a relatively low-impact conditioning option because you remain seated rather than repeatedly striking the ground as you would while running. Low impact does not mean low intensity, however. A properly structured assault bike session can still place a substantial demand on your cardiovascular system and muscles.
The original article highlights several reasons people use the assault bike, including calorie expenditure, strength and endurance development, high-intensity conditioning, scalability, and active recovery.
The important distinction is that each benefit depends on how you structure the workout.
A short sprint session will feel very different from a 30-minute endurance ride. Neither is inherently better. They simply train different qualities.
How to Use an Assault Bike Properly
Before getting into the workouts, it is worth understanding the basic position and movement.
Adjust the seat so that you can pedal comfortably without having to excessively straighten or bend your knees. Your exact seat position will depend on your height and proportions, but you should be able to maintain a controlled pedal stroke without rocking your hips from side to side.
Keep your feet securely positioned on the pedals and sit tall enough to maintain control of your upper body.
During the movement, allow your arms and legs to work together naturally. You do not need to aggressively throw your entire body into every stroke. Strong, coordinated movement is more sustainable and makes it easier to maintain a consistent pace.
Your grip should be firm but not excessively tense. If you squeeze the handles as hard as possible throughout the workout, your forearms and shoulders may fatigue sooner than necessary.
Breathing should remain a priority.
During easier efforts, try to establish a steady breathing rhythm. During harder intervals, your breathing will naturally become faster. The goal is not to force a specific breathing pattern at all costs, but to avoid holding your breath or allowing your breathing to become unnecessarily erratic.
Most importantly, learn to recognize the difference between hard work and uncontrolled effort.
A good workout should challenge you while still allowing you to follow the intended structure.
1. Assault Bike Workout for Beginners
If you are new to the assault bike, the first goal should not be to find out how fast you can go.
It should be learning how to pace yourself.
The assault bike can feel surprisingly demanding during the first few minutes, especially if you are not accustomed to using both your arms and legs at the same time. Going too hard at the beginning can cause your heart rate to climb rapidly and make the remainder of the workout unnecessarily difficult.
The original beginner workout uses a simple 30-second work and 30-second rest structure repeated for 10 rounds.
Workout
30 seconds: Moderate effort
30 seconds: Easy recovery or complete rest
Repeat: 10 rounds
The key word is moderate.
Your work intervals should feel purposeful, but you should not treat them as sprints. You should finish each 30-second effort feeling that you could have pushed somewhat harder if necessary.
During the recovery period, allow your breathing to settle before the next round.
If ten rounds feel excessive during your first session, reduce the number of rounds. It is better to complete six controlled rounds and finish feeling capable than to start too aggressively and struggle through the final four.
2. Fat-Burning Assault Bike Workout
The assault bike is often used in workouts designed around calorie expenditure because it allows you to create high levels of effort in a relatively short amount of time.
However, it is important to understand that there is no special assault bike setting that automatically causes fat loss.
Fat loss is influenced by your overall energy balance, nutrition, activity levels, and long-term consistency. The role of the assault bike is to provide an effective form of physical activity that can increase energy expenditure while improving fitness.
For this workout, the original article recommends short, hard intervals followed by longer recovery periods.
Workout
20 seconds: Hard sprint
40 seconds: Easy pedaling
Repeat: 12 rounds
The 20-second work period should be significantly harder than the beginner workout.
However, “hard” does not necessarily mean that every round needs to be an uncontrolled maximum sprint. The goal is to produce a strong effort while keeping enough consistency to complete all 12 rounds.
The first few intervals may feel relatively easy compared with the final rounds. That is normal.
As fatigue accumulates, maintaining your output becomes the challenge.
During the recovery periods, keep the bike moving at a comfortable pace rather than immediately stopping if you can recover more effectively through light pedaling.
This workout is short enough to fit into a busy schedule while still creating a substantial conditioning challenge.
3. Endurance Assault Bike Workout
Not every assault bike workout needs to be fast.
If your goal is to improve endurance, spending more time on the bike at a controlled intensity can be more useful than repeatedly performing maximum-effort sprints.
The original endurance workout recommends riding for 20 to 30 minutes at approximately 60 to 70 percent of maximum effort while maintaining steady breathing and a consistent pace.
Workout
Duration: 20 to 30 minutes
Intensity: Approximately 60 to 70 percent of maximum effort
Goal: Maintain a steady pace throughout the session
The biggest mistake during an endurance session is starting too quickly.
The first five minutes should feel manageable. If you are already fighting to control your breathing at the beginning, your pace is probably too aggressive.
Instead, settle into a rhythm that you believe you can maintain for the entire workout.
Your breathing should become noticeably elevated, but you should still feel in control.
As your fitness improves, you can gradually extend the duration toward the upper end of the range.
You can also use the session as a way to learn pacing. Pay attention to your output and how your body feels at different points during the ride. Over time, you may find that you can maintain a higher pace without experiencing the same level of fatigue.
4. CrossFit Assault Bike Workout: Sprint and Strength Combination
The assault bike is a common conditioning tool in CrossFit-style training because it can be combined with bodyweight exercises to create fast-paced full-body workouts.
The original workout combines 10 calories on the assault bike with 10 push-ups and 10 air squats, followed by a one-minute rest. It is repeated for five rounds.
Workout
10 calories: Assault bike
10 reps: Push-ups
10 reps: Air squats
Rest: 1 minute
Repeat: 5 rounds
The goal is to maintain a consistent level of effort across all five rounds.
Do not treat the first round as a test of how quickly you can finish.
The bike will raise your heart rate, and the push-ups and air squats add additional muscular fatigue. If you sprint through the first round and then have to dramatically slow down, you have probably paced the workout too aggressively.
Instead, find a rhythm that allows you to work continuously while maintaining reasonable form.
If standard push-ups are too difficult, modify them to a variation you can perform with control. The same principle applies to the air squats. The workout should challenge your conditioning without forcing you to sacrifice technique.
5. HIIT Assault Bike Workout
High-intensity interval training can provide a significant conditioning stimulus in a relatively short amount of time.
The assault bike is particularly well suited to HIIT because you can accelerate quickly, produce a high output, and reduce the intensity almost immediately when the work period ends.
The original workout uses 15-second all-out efforts followed by 45 seconds of recovery for 15 to 20 rounds.
Workout
15 seconds: All-out effort
45 seconds: Recovery
Repeat: 15 to 20 rounds
This is a demanding session.
The short work period allows you to produce a very high level of effort, but the cumulative fatigue from 15 to 20 rounds can be significant.
For that reason, beginners should not feel obligated to complete the full 20 rounds.
Start with fewer rounds and assess how well you recover.
The quality of the sprint matters more than simply accumulating a large number of intervals.
During each sprint, push the pedals and handles with intent. Once the interval ends, reduce your effort and focus on recovering enough to make the next sprint productive.
6. Tabata Assault Bike Workout
Tabata is a familiar interval format consisting of 20 seconds of intense work followed by 10 seconds of rest, repeated eight times.
The entire protocol lasts only four minutes, but that does not mean it is easy.
The original assault bike version uses eight rounds of 20 seconds of all-out effort followed by 10 seconds of rest.
Workout
20 seconds: Hard effort
10 seconds: Rest
Repeat: 8 rounds
Total: 4 minutes
The short recovery period is what makes the format challenging.
You have just enough time to recover slightly before beginning another effort, but not enough time to feel completely fresh.
Because the workout is only four minutes long, it can be tempting to treat every second as a maximal sprint. However, the quality of the entire eight-round sequence matters.
If your output drops dramatically after the first few rounds, consider starting slightly more conservatively.
The goal is to produce a strong effort throughout the protocol rather than destroying yourself during the first minute.
7. Active Recovery Assault Bike Workout
The assault bike is not only useful for hard conditioning sessions.
It can also be used on easier days when you want to stay active without placing another major training demand on your body.
The original active recovery workout recommends 15 to 20 minutes at approximately 50 percent effort, with a focus on controlled breathing.
Workout
Duration: 15 to 20 minutes
Intensity: Approximately 50 percent effort
Goal: Easy, continuous movement
This session should feel comfortable.
You should not finish exhausted or feel as though you have completed another hard workout.
Keep the resistance and pace low enough that you can maintain relaxed, controlled breathing.
The purpose is simply to keep moving.
Active recovery can be particularly useful after demanding strength or conditioning sessions. It gives you a way to remain active while keeping the overall intensity low.
However, do not feel that you must exercise on every rest day. Complete rest is also valuable when your body needs it.
Use an easy assault bike session when light movement feels better than complete inactivity.
8. Performance Challenge: The 50-Calorie Test
The 50-calorie test provides a straightforward way to measure your performance.
The original workout asks you to complete 50 calories as quickly as possible while recording your time.
Workout
Target: 50 calories
Goal: Complete the distance as quickly as you can while maintaining effective pacing
Metric: Record your finishing time
Unlike the previous workouts, this is less about following a fixed interval structure and more about testing your ability to manage sustained high output.
The biggest mistake is starting at a pace that cannot be maintained.
The first few calories may feel easy. That does not mean you should immediately increase your output.
Think of the test as a pacing exercise.
Start hard enough to establish a strong pace, but leave yourself enough capacity to maintain your output as fatigue builds.
Once you have completed the test, record your time.
You can then repeat it later under similar conditions and compare your performance.
How to Choose the Right Assault Bike Workout
With eight different options available, choosing the right workout comes down to your current fitness level and what you want to accomplish.
If you are new to the machine, begin with the beginner workout. It gives you an opportunity to learn the movement and practice pacing without immediately pushing into maximal intensity.
If you want to improve endurance, choose the longer steady-state session. This will allow you to spend more time developing your aerobic capacity without the recovery demands of repeated sprints.
For short, intense conditioning, the HIIT or Tabata formats are appropriate for experienced users who can tolerate high-intensity work.
If you enjoy CrossFit-style training, the bike, push-up, and air squat workout provides a simple full-body conditioning challenge.
For days when you want to stay active without adding significant fatigue, the active recovery session is the better choice.
The 50-calorie test is best treated as a performance benchmark rather than a workout you need to perform frequently.
You do not need to complete all eight workouts in the same week.
In fact, doing so would be unnecessary for most people.
Choose one or two formats that fit your current training and use them consistently.
How to Warm Up for an Assault Bike Workout
A proper warm-up helps you transition from rest into exercise gradually.
The original article recommends three to five minutes of easy pedaling before assault bike workouts.
That is a useful starting point.
Begin at an easy pace and allow your breathing to increase gradually.
You can then spend another minute or two gradually increasing your output before beginning the actual workout.
For a high-intensity session, a few short practice accelerations can also help prepare you for the demands of sprinting.
The warm-up should prepare you without creating fatigue.
If you finish your warm-up feeling exhausted, you have gone too hard.
How to Pace Yourself on an Assault Bike
Pacing is one of the most important skills you can develop on the assault bike.
Because the machine responds directly to your effort, it is very easy to start too aggressively.
This is especially common during interval workouts.
You may feel fresh during the first round and push far harder than the workout requires. Several rounds later, fatigue catches up with you and your output drops dramatically.
A better approach is to think about the entire workout before beginning.
Ask yourself how difficult the work interval is supposed to feel and how much recovery you have available.
A 20-second sprint followed by 40 seconds of recovery can support a much higher output than a 20-second sprint followed by only 10 seconds of recovery.
Your pace should reflect that difference.
Over time, you will become better at judging your effort based on the workout structure.
How to Track Assault Bike Progress
The assault bike provides several useful ways to track progress.
You can record your time, calories, distance, or output depending on the workout and the information displayed by your machine.
For interval workouts, you can also record the output of each work interval and look for consistency.
For example, if your first sprint produces a very high number but your final intervals fall dramatically, you may need to improve your pacing.
If you can maintain a stronger output across all of your intervals, that is a meaningful improvement even if your best single effort has not changed.
For endurance sessions, track the duration and your average pace or output when available.
For the 50-calorie benchmark, simply recording your finishing time can provide an easy comparison between testing sessions.
Keep your testing conditions reasonably consistent. Changes in warm-up, fatigue, equipment settings, or training immediately before the test can influence your performance.
Common Assault Bike Mistakes
The assault bike encourages hard work, but more intensity is not always better.
One common mistake is sprinting immediately after sitting down. Without a warm-up, the transition from rest to maximum effort can feel unnecessarily difficult.
Another mistake is using poor posture as fatigue increases.
As the workout becomes challenging, you may begin collapsing forward or using exaggerated movements to keep the pedals moving. Some movement is natural, but your technique should remain controlled.
Another problem is failing to pace interval workouts.
If your workout requires multiple rounds, the first round should not look dramatically different from the last simply because you went too hard at the beginning.
Finally, do not turn every assault bike session into a test.
Your body needs a mix of intensities. Easier aerobic sessions and active recovery workouts can support your conditioning while allowing you to recover from harder training.
How Often Should You Do Assault Bike Workouts?
The ideal frequency depends on what else you do during the week.
If the assault bike is your primary form of cardiovascular training, you may use it several times per week with different intensities.
For example, you might combine one interval session with one longer endurance ride and one easy recovery session.
If you already perform CrossFit, strength training, running, or other demanding conditioning work, you may need less direct assault bike training.
Remember that the assault bike can create significant fatigue, particularly when used for repeated sprint sessions.
Your training should include enough easier work and rest to allow you to recover.
The best program is not the one that contains the most workouts.
It is the one you can perform consistently while continuing to improve.
Final Thoughts
The assault bike is one of the most versatile conditioning tools available because you can make the workout as easy or as demanding as your current fitness allows.
You can use it to learn basic pacing, build aerobic endurance, perform short high-intensity intervals, supplement a CrossFit workout, or simply keep your body moving on an easier day.
The eight workouts in this guide provide different ways to approach the machine, but they all depend on the same principle: match the intensity to the goal.
A beginner does not need to start with all-out sprints. Someone training for endurance does not need to turn every ride into a competition. An experienced athlete may benefit from high-intensity intervals, but even advanced training requires appropriate recovery.
Start with the workout that matches your current ability.
Learn how the bike feels at different intensities. Pay attention to your breathing, your output, and how quickly you recover between efforts. As you become more experienced, you will get better at judging when to push and when to hold back.
Most importantly, do not confuse exhaustion with progress.
A workout does not have to leave you completely drained to be effective. Sometimes the most productive session is the one where you maintain a steady pace for 20 or 30 minutes. Other times, a few carefully structured sprints are enough.
Use the assault bike strategically, track your performance, and increase the challenge gradually.
Whether your goal is better endurance, improved conditioning, fat loss, or stronger performance in CrossFit-style training, the assault bike can be a valuable part of your program when you use it with purpose.
The machine will always be ready to challenge you.
Your job is to learn how to use that challenge wisely.
Last Updated on September 3, 2026
Written By

Join thousands of readers leveling up their fitness.
Skip the guesswork—get insights on training, health, and the right gear to support your progress.
You may also like

How To Do A Lat Pulldown Correctly
The lat pulldown is one of the best exercises for building a wider, stronger…
10 Different Types Of Deadlifts And Their Benefits
The deadlift is one of the most powerful compound exercises for building…

How to Strengthen Your Knees for Running
Strong, healthy knees are essential for runners, whether you’re logging miles…

Compound vs. Isolation Exercises: What’s the Difference?
When it comes to strength training, all exercises can generally be divided into…
Back Squat Exercise Guide: How to Master Back Squats
The back squat is one of the most effective strength training exercises for…
10 Medicine Ball Ab Exercises You Need To Try
If you’re tired of traditional crunches and planks, it’s time to add some…